Securing a web API with Basic Authentication
In today’s interconnected digital world, securing web APIs is most important. Whether you’re building a small-scale application or a large enterprise system, protecting your API endpoints is crucial for safeguarding sensitive data and maintaining the integrity of your services. One of the simplest yet effective methods for securing a web API is through Basic Authentication. In this blog post, we’ll explore how to implement Basic Authentication in a C# web API.
What is basic authentication?
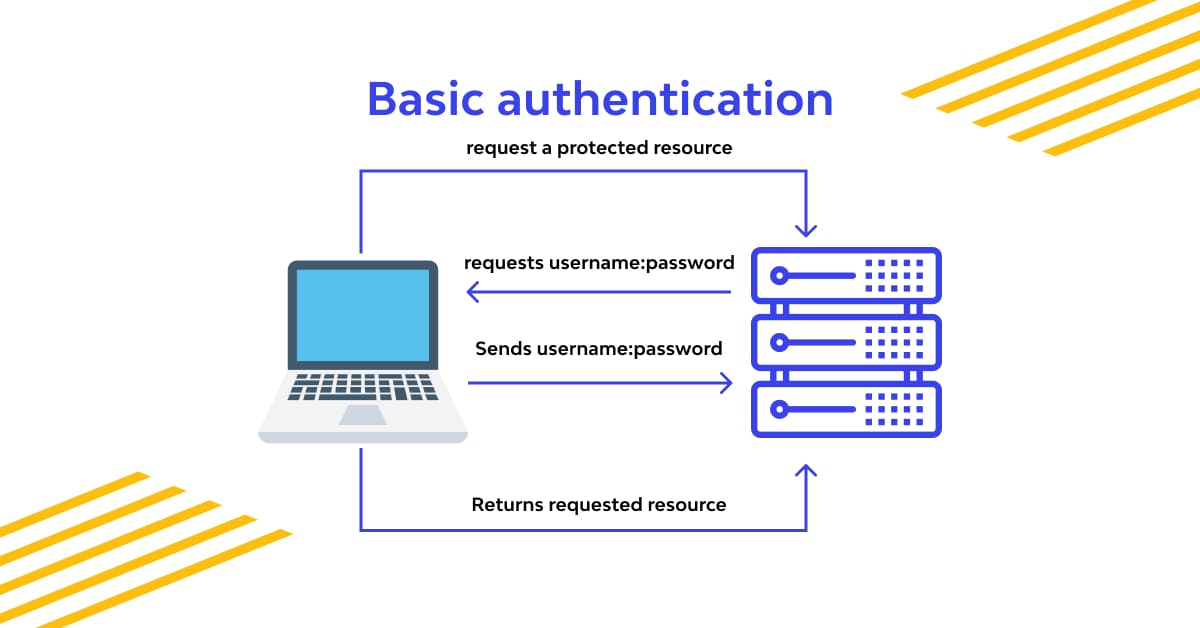
Basic Authentication is a widely used method for securing web resources. It is a simple authentication scheme built into the HTTP protocol which involves sending a username and password with each request, encoded in the HTTP headers. While it’s not the most secure method available, it provides a basic level of protection and is easy to implement.
The client sends an HTTP request with a header containing the word “Basic” followed by a space and a base64-encoded string “username:password”. The server decodes the base64-encoded string and checks if the provided username and password are valid. If they are, the server sends back the requested data; if not, it sends back a 401 Unauthorized response.
Setting Up a C# Web API Project
To demonstrate Basic Authentication, let’s create a simple C# Web API project using ASP.NET Core. You can start by creating a new project in Visual Studio or your preferred IDE.
Once the project has been created, we will need to add a reference to the System.Web.Http assembly. This assembly contains the necessary classes for implementing basic authentication in a C# web API.
using Microsoft.AspNetCore.Builder;
using Microsoft.AspNetCore.Hosting;
using Microsoft.Extensions.DependencyInjection;
using Microsoft.Extensions.Hosting;

namespace BasicAuthWebAPI
{
    public class Startup
    {
        public void ConfigureServices(IServiceCollection services)
        {
            services.AddControllers();
        }

        public void Configure(IApplicationBuilder app, IWebHostEnvironment env)
        {
            if (env.IsDevelopment())
            {
                app.UseDeveloperExceptionPage();
            }

            app.UseRouting();

            app.UseAuthentication(); // Enable authentication

            app.UseEndpoints(endpoints =>
            {
                endpoints.MapControllers();
            });
        }
    }
}
Next, we will need to create a custom authentication filter. This filter will be responsible for checking the incoming request for the presence of a valid username and password. To do this, we will create a new class that derives from the System.Web.Http.Filters.AuthenticationFilterAttribute class and override the AuthenticateAsync method.
In the AuthenticateAsync method, we will first check for the presence of an “Authorization” header in the incoming request. If the header is present, we will extract the username and password from the header and check them against our database of valid credentials. If the credentials are valid, we will allow the request to proceed otherwise we will return a 401 Unauthorized response to the client.
Here is some example code for our custom authentication filter:
public class BasicAuthenticationFilter : AuthenticationFilterAttribute
{
    public override async Task AuthenticateAsync(HttpAuthenticationContext context, CancellationToken cancellationToken)
    {
        // Get the request message
        HttpRequestMessage request = context.Request;

        // Check for the presence of the "Authorization" header
        if (request.Headers.Authorization == null)
        {
            // No authorization header was found, so return a 401 Unauthorized response
            context.ErrorResult = new UnauthorizedResult(new AuthenticationHeaderValue[0], context.Request);
            return;
        }

        // Extract the username and password from the "Authorization" header
        string username = request.Headers.Authorization.Parameter;
        string password = request.Headers.Authorization.ToString().Split(' ')[1];

        // Validate the username and password against our database of valid credentials
        if (!IsValidCredential(username, password))
        {
            // The credentials are not valid, so return a 401 Unauthorized response
            context.ErrorResult = new UnauthorizedResult(new AuthenticationHeaderValue[0], context.Request);
            return;
        }

        // The credentials are valid, so set the authenticated user on the current principal
        IPrincipal principal = new GenericPrincipal(new GenericIdentity(username), new string[0]);
        context.Principal = principal;
    }
}
Now that we have our custom authentication filter, we can apply it to our web API controllers or actions as needed. To do this, we simply decorate the controllers or actions with our filter attribute like so:
[BasicAuthenticationFilter]
public class MyController : ApiController
{
    // Controller actions go here
}
That’s all there is to it! With these steps, you should now have a basic authentication system in place for your C# web API.
Testing the Basic Authentication
To test our Basic Authentication setup, we can send an HTTP request to one of our API endpoints, providing the credentials in the Authorization header.
GET /api/values HTTP/1.1
Host: localhost:5000
Authorization: Basic YWRtaW46cGFzc3dvcmQ=
In this example, “YWRtaW46cGFzc3dvcmQ=” is the Base64 encoded string “admin:password”.
Conclusion
Basic Authentication offers a simple yet effective way to secure your web API endpoints. While it’s not suitable for all scenarios, especially those involving sensitive or highly valuable data, it can serve as a good starting point for securing your API during development or for internal use. As always, consider the specific security requirements of your application and choose the appropriate authentication method accordingly.
By following the steps outlined in this blog post, you can easily implement Basic Authentication in your C# web API project and enhance the security of your application.
Keep in mind that basic authentication is not the most secure authentication method, as the username and password are sent in plain text with every request. For more secure authentication methods, you may want to consider implementing OAuth or some other form of token-based authentication.
Thank you for reading. Stay Safe, Stay Secure!


